How cameras are changing surveying: a field story with the Reach RS4 Pro
New technologies are transforming how work is done across industries, and surveying is no exception. What’s changing today is how clearly that data shows up in the field.
Let’s break down how the Augmented Reality (AR) stakeout and Visual capture tools on the Reach RS4 Pro are changing day-to-day surveying, making layout clearer, documentation easier, and fieldwork safer.
Survey data you can see with AR stakeout
AR stakeout is a faster way to stake out reference points, curb lines, corners, and any other target objects, especially on busy sites where everyone needs clarity.
With AR stakeout on the Reach RS4 Pro, you don’t have to guess where the design objects are in the field: design points and lines appear right in your camera view. This lets you walk straight to the target and verify it on the spot, without chasing numbers on a screen.
Finding the right object on site
On sites where many objects need to be staked out, especially when there are dozens of similar points or repeated elements, it can be difficult to quickly orient yourself.
Points on the plan may look almost identical in the field, and before any work can begin, time is spent matching the map to the real environment to ensure the correct location has been identified.
In these situations, surveyors often need to constantly switch their attention between the map and the ground, checking distances, directions, and nearby features to confirm they are in the right place.
This process works, but it slows things down and increases the chance of confusion, particularly on large or unfamiliar sites.
AR stakeout in Emlid Flow helps bring the design and the real world together. When used with the Reach RS4 Pro, design points and lines are visualized directly in the field through a mobile device and aligned with the surrounding environment.
Instead of interpreting the plan and mentally translating it, the surveyor can see where each object is meant to be relative to what is already on site. Reducing the time needed to “get your bearings,” AR stakeout allows you to start working faster and with more confidence—even on complex or unfamiliar sites.
What AR stakeout does
AR stakeout isn’t a gimmick. It solves real, everyday problems surveyors face, keeping precision at the centimeter level:
- You don’t have to interpret abstract numbers. The target appears visually, like a mark painted on the site.
- Everyone understands it instantly. Do you have a new crew member, client, or inspector? If they can see, they can understand.
- The tool is perfect for tight, cluttered, or uneven areas. A glowing virtual line is easier to follow than interpreting object IDs in the field.
With these advantages in mind, AR stakeout can be useful in many field scenarios, including the following construction phases:
1. Construction layout on busy sites
AR stakeout displays design elements directly in the camera view, enabling crews to place or restore stakes without waiting for a surveyor.
Related reading: GNSS workflows for any construction team that cut your costs
2. Crew coordination and handoff
AR visuals make it easier to explain layouts to non-surveyors. Foremen and machine operators can see exactly where points and lines are meant to go. There is no need to interpret coordinates or drawings in the field.
3. Quality control
After staking, the AR stakeout tool can be used to double-check placement against the design. If something looks off, it’s immediately visible—before it becomes costly rework.
Crews can quickly check foundations, trenches, and utilities against actual site conditions, identify conflicts early, and confirm positions before construction begins. This is especially useful on busy sites with many active elements.
4. Subcontractor control
During handover, the subcontractor’s as-built drawings can be imported into Emlid Flow in CAD format and quickly verified against the configured design.
This makes it easier to check compliance, maintain control over subcontracted work, and identify discrepancies before acceptance.
How AR stakeout works in Emlid Flow
With the Reach RS4 Pro, the AR stakeout tool in Emlid Flow overlays your target line on the live camera view and provides real-time approach cues as you move. Before you start, make sure you have a stable FIX solution and tilt compensation enabled.
In this article, we’ll show you how to stake out a line using AR guidance. The process for staking out a point is nearly identical, except that line stakeout offers additional mode options.
Then do as follows:
1. Open your project in Emlid Flow, select the object, and start staking it out.
2. Switch the mode you’d like to stake out the line. We will opt for Along line, but you can differentiate between the following ones.
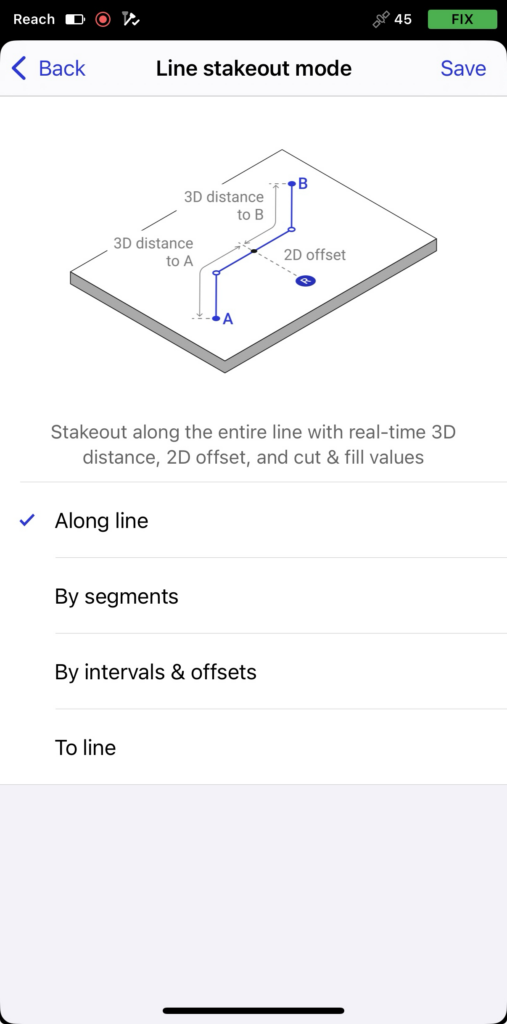
- Along line: Instead of simply guiding you to the line, this mode keeps you aligned and directs you forward or backward along it.
- By segments: Using this mode, you can stake out individual segments of a line or polygon.
- To line: In this mode, you can receive guidance on locating a line, polygon, or segment on the site.
- By intervals and offsets: In this mode, you can stake out points along a line, polygon, or segment at predefined intervals. You can also apply horizontal and vertical offsets to shift each point relative to the original line geometry.
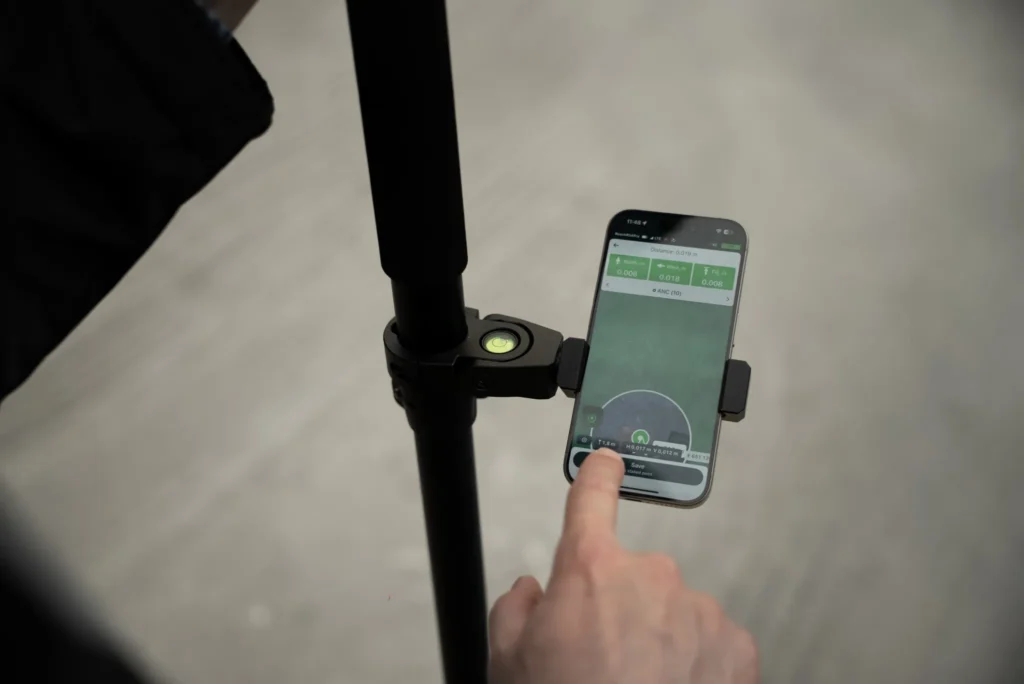
3. To switch to AR stakeout mode, open the camera view. The chosen design object appears overlaid on the real world.
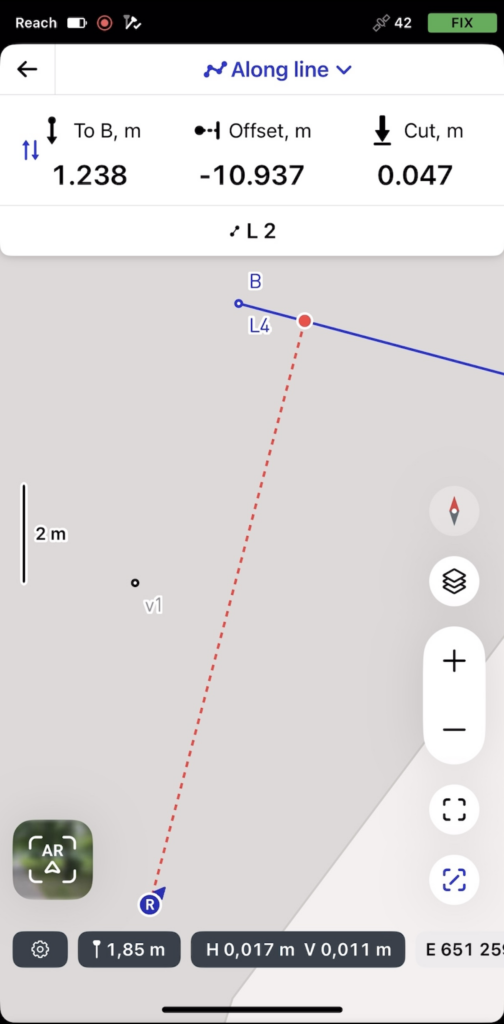
4. Walk toward the target. Move naturally while watching the AR guidance. Distance and direction update in real-time. As you get closer, the view switches to the bull’s-eye showing precise visual cues. When indicators turn green, you’re within tolerance. You can then continue moving along the line while monitoring the offset panel to maintain the required position.
5. Place the stake or confirm alignment.
To see how it works in practice, watch the demo video prepared by our Application Engineer, Julia. Alternatively, you can read our guide on using the AR stakeout tool for points and lines.
Capture hard-to-reach points with Visual capture
When a point is hard to reach or unsafe to measure, the Visual capture feature on the Reach RS4 Pro keeps the job moving. It delivers centimeter-level photogrammetry using your existing receiver, without additional hardware or software, and without a full photogrammetry workflow.
Data is captured and processed in real time: all you need is a FIX solution and tilt compensation enabled. Emlid Flow builds a 3D model from the footage and calculates the object’s position.
Measuring unreachable or unsafe points
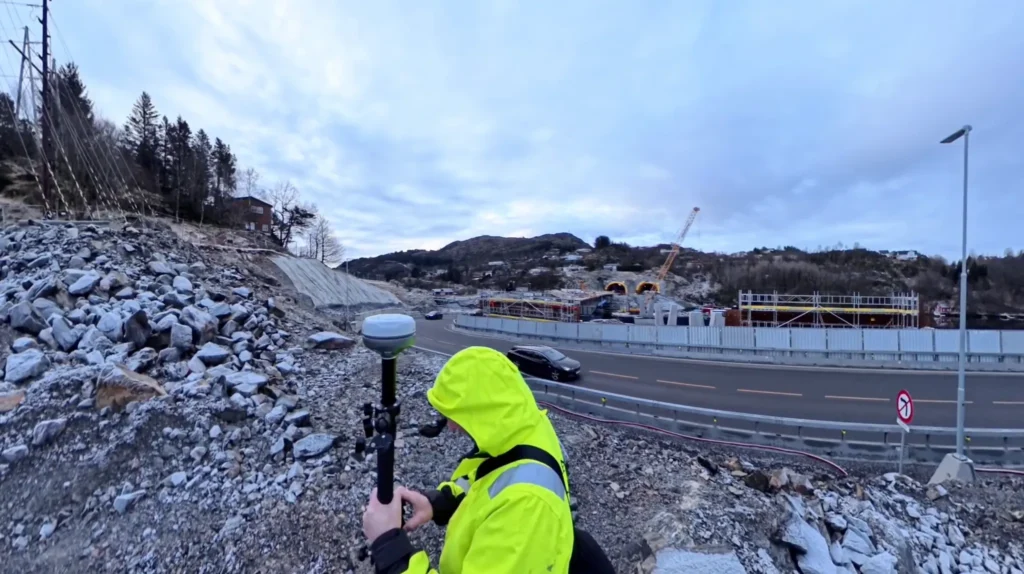
When physically reaching a point is unsafe or impractical—for example, across an active road, a highway, or a restricted area—Visual capture with the Reach RS4 Pro provides a practical alternative.
Instead of directly accessing the point, the surveyor aims the receiver at the target, frames it in the camera view, and captures the measurement from a safe location. Emlid Flow automatically calculates coordinates from captured imagery and GNSS data.
With Visual capture, points that would otherwise require additional equipment, traffic control, or return visits can be measured quickly, safely, and with clear documentation.
What Visual capture does?
Visual capture isn’t just nice to have. When access to the point is limited, you can still capture what you need without improvising or having to come back later.
Visual capture is especially helpful when:
- The object is unreachable. Your project features numerous roof edges, facades, bridge elements, poles, and overhead utilities.
- It’s not safe to get close due to the traffic, unstable ground, active excavation, and steep slopes.
- The point is blocked. Site conditions—such as equipment, stockpiles, fencing, standing water, or other obstacles—prevent direct access.
It’s a practical way to turn “we couldn’t measure that safely” into “we captured it with minimal effort.”
The Visual capture tool may be helpful across different construction phases:
1. Pre-construction
Quickly collect data on unreachable or unsafe objects within a defined distance, without getting too close or using a total station, for design and planning. This is ideal when points cannot be measured due to obstructions, limited visibility, or overhead structures.
2. Construction verification and checks
Verify positions and, in particular, elevations of structures and surfaces when direct measurement isn’t possible—for example, in deep excavations or large pits.
3. As-built documentation preparation
Capture the geometry of constructed elements to produce accurate as-built drawings. Record completed work efficiently, even in areas that are difficult to access or unsafe for direct measurement.
How AR stakeout works in Emlid Flow
To measure a point with Visual capture on the Reach RS4 Pro, start by connecting to the receiver in Emlid Flow, establishing a FIX solution, and enabling tilt compensation.
Before measuring the target object, meet the following conditions:
- Use well-lit, high-texture targets. Select areas with distinct features, such as joints, edges, tape targets, markings, bolts, or other high-contrast details. Low-texture or uniform surfaces, like freshly poured concrete or glossy finishes, can significantly reduce accuracy.
- Keep a 2–10 m (6–33 ft) distance from the target.
- Move slowly along an arc while recording to capture the target from multiple angles.
Once you’re ready, do the following steps:
1. Import or create a project in the Emlid Flow app.
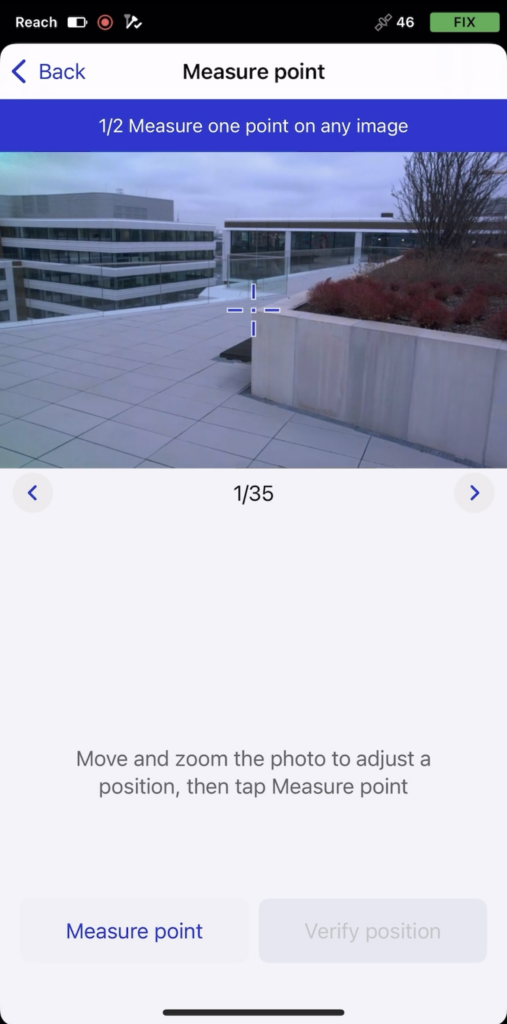
2. Access the Collector tool and tap the Camera icon.
3. Frame the target object in the on-screen square and start recording it from a distance of approximately 2 to 10 meters away. Walk slowly along an arc to capture the object from multiple angles. Front and at least one side work best.
4. Let the app process the scene.
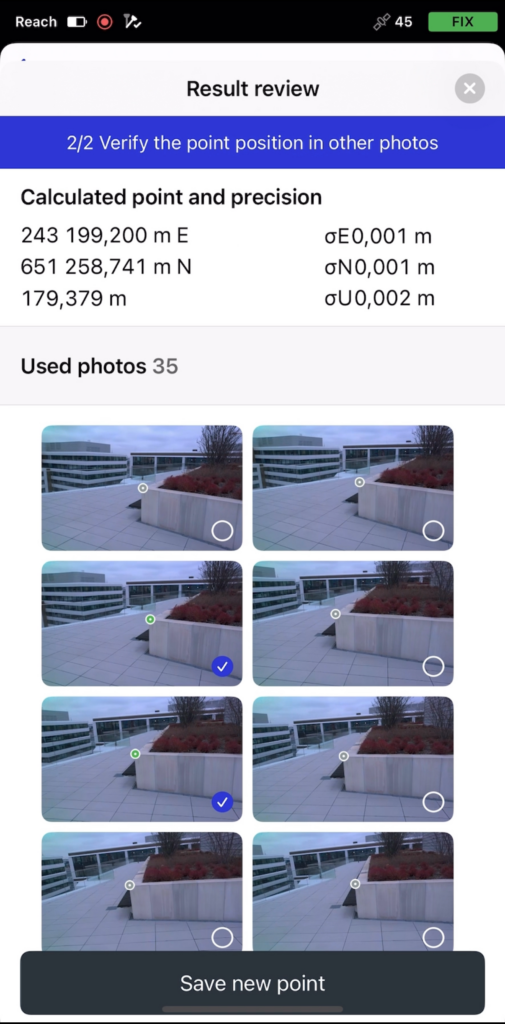
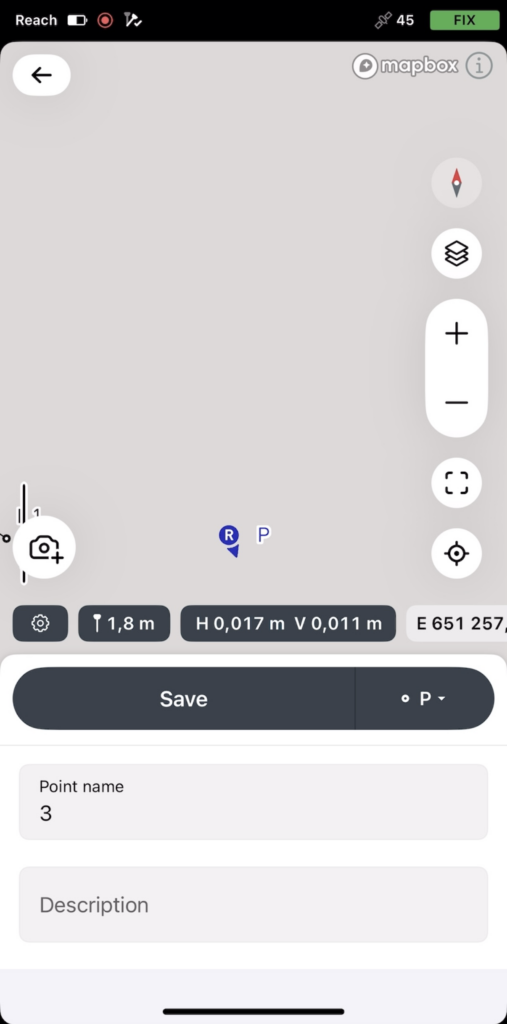
5. Measure the point, verify it, and adjust as needed across several frames.
6. Save the new point.
If you need to add another point later, simply reopen the saved scene from your project. The scene is split into several images, allowing you to zoom in or out and adjust the crosshair to precisely select and measure an additional point.
To see how the tool works in practice, watch the demo video prepared by our Application Engineer, Julia. Alternatively, you can read our guide on using the Visual capture tool on your Reach RS4 Pro.
What makes the Reach RS4 Pro your choice?
The RS4 Pro isn’t just a GNSS receiver with cameras. It’s built for visual workflows, with the following characteristics to support them:
- Factory-calibrated dual full-HD cameras supporting AR stakeout and Visual capture.
- Tilt compensation that initializes faster and ignores magnetic interference.
- All-band, 672-channel GNSS for consistent accuracy.
- Rugged build, ready for any weather or environment.
- Long battery life, smart mounting options, and dependable performance.
It’s a visual surveying tool built on top of a powerful GNSS engine.
Frequently Asked Questions
The AR stakeout tool overlays design points and lines directly onto the live camera view, so you can see where objects are in the field without having to interpret coordinates or maps.
It’s especially helpful on busy or complex sites for construction layout, crew coordination, verification, and checking subcontractor work, where clarity and quick understanding are critical.
Yes. AR Stakeout achieves centimeter-level accuracy when a FIX solution and tilt compensation are enabled.
The Visual capture tool lets you measure hard-to-reach or unsafe points using the built-in camera, compensated GNSS data, and real-time photogrammetry without extra hardware, software, or a full photogrammetry workflow.
Use it when points are: unsafe to access, physically unreachable, blocked by equipment, fencing, or other obstacles.
Visual capture can be used during pre-construction for existing conditions checks and planning, construction for verification and grade checks and post-construction for as-built documentation preparation.
Yes. You can reopen saved scenes in Emlid Flow and measure additional points later by adjusting the crosshair across multiple frames.
No. Both AR stakeout and Visual Capture work with the built-in cameras on the Reach RS4 Pro using the Emlid Flow companion app.