As-built surveys: a field-to-office workflow with Emlid Reach receivers
An as-built survey documents what was actually built. By this stage, construction work is complete and ready to be covered, closed, or handed over. The purpose is to record the final position, dimensions, and elevation of finished structures—utilities before they disappear underground, foundations before the next stage, or completed grades before acceptance.
That record becomes the reference handed over to the client, used in facility management, and pulled up if questions or disputes arise later.
This post covers how to run that workflow end-to-end using Reach receivers, Emlid Flow, and Emlid Flow 360.
Setting up before you leave the office
The quality of an as-built survey starts before anyone sets foot on site. Coordinate system errors, mismatched design files, and missing codes are the kind of problems that surface at the worst possible moment—halfway through a stakeout check with the client watching.
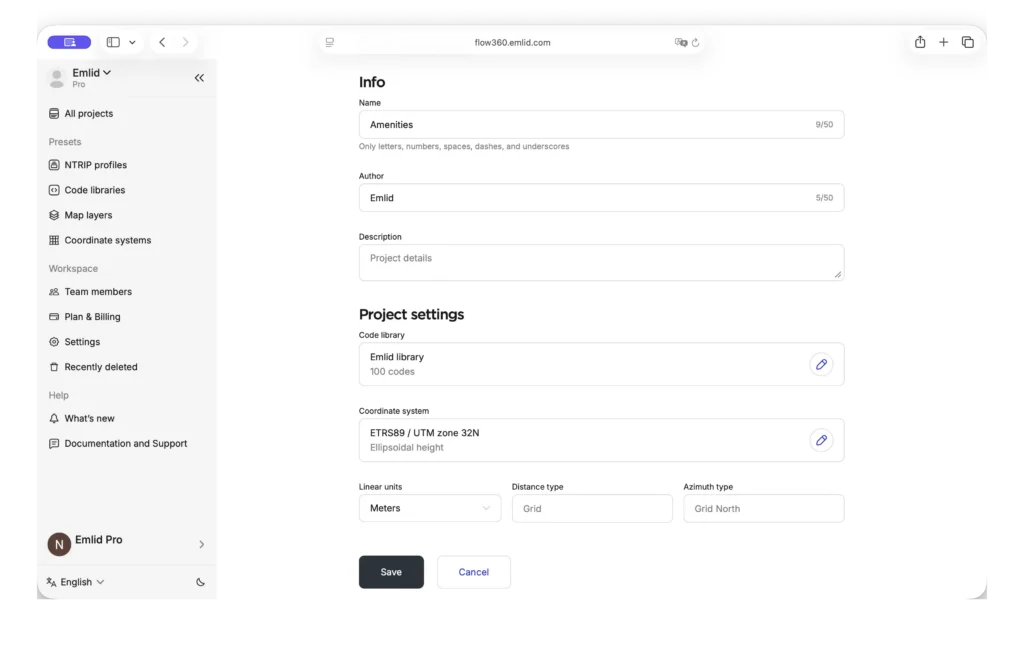
Start in Emlid Flow 360. Set your coordinate system first. Everything else—imported geometry, stakeout positions, collected points—is referenced against it, so confirm it before importing anything else. If the project uses a local grid or a site calibration, apply it here.
With the coordinate system in place, bring in your design files: CAD linework, LandXML surfaces, WMS background layers for spatial context, and survey codes for consistent data collection across the crew. Organize the codes with attributes so the field crew can capture structured data—not just a point, but what that point represents and any relevant properties attached to it.
Once the project is set up in Emlid Flow 360, it syncs automatically with Emlid Flow on the tablet or smartphone in the field. The crew arrives on site with everything they need already loaded.
Getting your setup sorted
Before collecting any as-built data, you’ll need an RTK correction source. Whether that’s a local base-and-rover setup or a Reach connected to a network correction service, the goal is the same—achieve centimeter-level positioning. If your RTK setup is already sorted, skip ahead to see how Emlid Flow supports the as-built workflow in the field.
Related reading: RTK corrections delivery method explained
The right setup for an as-built survey depends on the site—its size, connectivity, and the number of people working on it.
For sites without reliable cellular coverage, two Reach RS4 receivers working over LoRa radio is the self-contained choice. No internet required, no external dependencies—the base sits on a known control point and sends its raw data directly to the rover. Where terrain is challenging or compatibility with third-party equipment is important, the RS4 also supports UHF radio via the Trimtalk 450S protocol.
You can also take advantage of Reach RS4 Pro as a rover, which adds AR Stakeout and Visual capture tools:
- AR stakeout provides a live, augmented-reality view that guides you to the target point without requiring you to stop and check coordinates on the screen.
- Visual Capture turns the receiver’s camera and the Emlid Flow app into a tool for measuring hard-to-reach points directly from images.
Where cellular coverage is available, corrections can travel over the internet via NTRIP, which removes the line-of-sight and range constraints of radio.
If you’re running multiple rovers across the site—surveyors, superintendents, and field engineers all checking against the same design—Emlid Caster lets a single RS4 base distribute corrections to up to 10 rovers simultaneously, with no additional base stations required.
For fast-turnaround jobs or sites where setting up a base isn’t practical, Reach RX2 connects directly to a network correction service and delivers centimeter-level accuracy in a compact, single-unit package. No base station, no radio link, no configuration overhead.
Whichever setup you use, the method connects to the same Emlid Flow workflow—the project, the design, and the stakeout reports don’t change based on which method you choose.
Documenting the final built position on site
With RTK running and the project open, the crew can record as-built conditions directly in the field. The goal is to document the completed state of each element as it exists on site.
First, when working with a design file, you can use the Stakeout tool to quickly orient yourself on site and navigate to objects. You can stake out points using directional guidance or distance-to-target information, or—when using Reach RS4 Pro—an augmented reality view through your mobile device’s camera.
This makes it easier to understand your surroundings and locate design elements, especially on large, busy, or cluttered sites where visual references may be limited.
The Collector tool is the main workflow for documenting finished features on site. It lets the crew collect points, lines, and polygons, using the same codes and attribute fields already set up in Emlid Flow 360.
Photos can also be attached directly to collected objects, allowing the crew to document site conditions and feature details while they are still visible. This keeps all as-built data—coordinates, attributes, and photos—structured and stored in a single project.
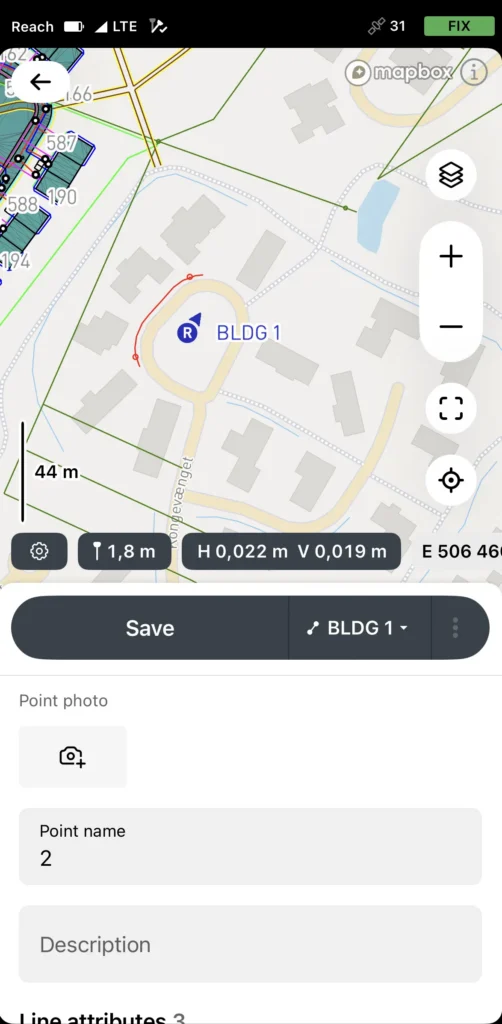
As each object is collected, Emlid Flow automatically opens the attribute form associated with the selected code. The crew can enter structured information such as dimensions, materials, depths, or installation details, and attach photos directly to the feature. This creates a complete as-built record that combines location data, attributes, and visual documentation in a single place.

Once the fieldwork is complete, the project manager can access the project in Emlid Flow 360 immediately. Thanks to automatic synchronization, all collected data is already available in the office, including points, attributes, photos, and other field records captured throughout the survey.
Related reading: Field-office collaboration in construction that actually works
The result is a field-measured record of the site as constructed—not an estimate or a reconstruction from memory, but a documented representation of what was actually built, ready for handover to the client and future use in operations, maintenance, and asset management.
How it works: utility as-builts on a residential subdivision
A crew is finishing groundwork on a residential subdivision. Before the trenches are backfilled, they need to document the final position of the sewer network, water main, and electrical conduits running across the site.
Once these utilities are buried, their exact location will no longer be visible, making accurate as-built records critical for future maintenance, repairs, and construction work. Below is a step-by-step workflow for documenting a site from scratch.
In the office, a Virtual Design and Construction (VDC) manager signs in to Emlid Flow 360 with the Emlid account and sets up the project as follows:
- Create a new project in your workspace.
- Select the required coordinate system from the coordinate system library or import the localization parameters.
- Create and apply a code library, if needed.
- Add map layers, if needed.
- Invite field engineers to the workspace with the project you created.
In the field, after setting up the RTK connection, field engineers or superintendents complete the following steps:
- Log in to Emlid Flow with their Emlid Account.
- Access your workspace with the project you created.
- Open the project.
- Start collecting objects, applying codes and attributes, and attaching photos when needed.
As the work progresses, the project becomes a complete record of the site. Each utility type uses its own survey code with the required attributes attached. For sewer pipes, the crew records material, diameter, depth to invert, and flow direction.
For the water main, they record material, diameter, and depth to crown. For electrical conduits, they record material, diameter, and depth. The crew can also attach photos to document the open trench and installed infrastructure before it is covered.

They begin with the sewer network. At the first manhole, the crew selects the manhole code, holds the receiver over the center of the chamber, and stores the point.
The attribute form opens automatically, where they enter the cover level, invert level, and attach a photo of the open chamber. From there, they follow the pipe run, collecting points at every change in direction and at the connection to the next manhole. Each sewer pipe point includes material, diameter, invert depth, and flow direction.
Next, they document the water main running parallel to the sewer. The crew switches to the water main code and walks the trench, collecting points at bends, tee connections, and valve chambers. At each valve chamber, they store the point, fill in the attributes, and attach a photo. Straight sections are captured at regular intervals, so the final record contains enough geometry to be useful later.
Finally, they capture the electrical conduits in the trench closer to the road edge. Using the conduit code, the crew records points at both ends of the run, at each change in direction, and at draw pits. Depth, material, and diameter are added to the attribute form for each point.
Before the excavator starts backfilling, the crew reviews the map in Emlid Flow and checks that all required objects are complete. Any gaps can still be fixed while the trench is open.
The result is a complete utility as-built record: coordinates, attributes, and photos for every documented feature, all stored in one project and ready to export, hand over, and reference later.
Emlid receivers and software are built for the way construction crews actually work, from stakeout to as-built, field to office.
Managing cut and fill: a field guide to grade control using Reach receivers and Emlid Flow
Three places construction projects lose money and how GNSS helps close the gap
How to run fast and error-free underground utility projects with GNSS
QA/QC workflows in construction: a practical guide for your field crew